Video Generation Using Diffusers
LTX-Video Pipeline for Video Generation
LTX-Video is the DiT-based video generation model capable of generating high-quality videos. This video generation pipeline turns a text prompt into a sequence of video frames:
- Prompt → tokens: the prompt is tokenized (and padded to the model’s max length).
- Tokens → text embeddings: a text encoder produces embeddings used to condition generation.
- Denoising loop: a Transformer predicts and refines video latents over multiple steps, while the scheduler controls the noise level at each step.
- Latents → frames: the final latents are decoded into RGB video frames.
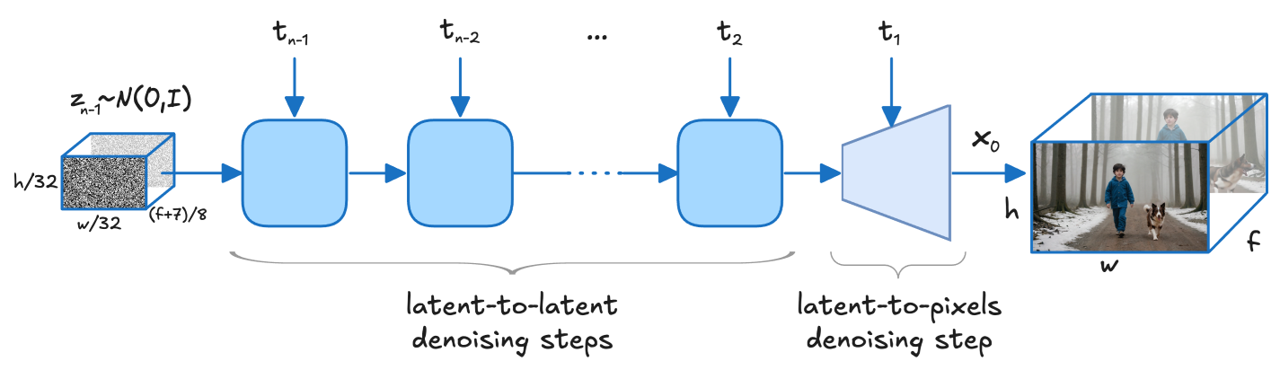 Source: arXiv:2501.00103
Convert and Optimize Model
Download and convert LTX model Lightricks/LTX-Video to OpenVINO format from Hugging Face:
optimum-cli export openvino --model Lightricks/LTX-Video --weight-format int8 --trust-remote-code LTX_Video_ov
Refer to the Model Preparation guide for detailed instructions on how to download, convert and optimize models for OpenVINO GenAI.
Run Model Using OpenVINO GenAI
OpenVINO GenAI supports the following video generation pipeline:
Text2VideoPipelinefor creating videos from text prompts.
- Python
- C++
- CPU
- GPU
import openvino_genai as ov_genai
import cv2

def save_video(filename: str, video_tensor, fps: int = 25):
  batch_size, num_frames, height, width, _ = video_tensor.shape
  video_data = video_tensor.data

  for b in range(batch_size):
      if batch_size == 1:
          output_path = filename
      else:
          base, ext = filename.rsplit(".", 1) if "." in filename else (filename, "avi")
          output_path = f"{base}_b{b}.{ext}"

      fourcc = cv2.VideoWriter_fourcc(*"MJPG")
      writer = cv2.VideoWriter(output_path, fourcc, fps, (width, height))

      for f in range(num_frames):
          writer.write(video_data[b, f])

      writer.release()
      print(f"Wrote {output_path} ({num_frames} frames, {width}x{height} @ {fps} fps)")


pipe = ov_genai.Text2VideoPipeline(model_path, "CPU")
video = pipe.generate(prompt).video

save_video("genai_video.avi", video)
import openvino_genai as ov_genai
import cv2

def save_video(filename: str, video_tensor, fps: int = 25):
  batch_size, num_frames, height, width, _ = video_tensor.shape
  video_data = video_tensor.data

  for b in range(batch_size):
      if batch_size == 1:
          output_path = filename
      else:
          base, ext = filename.rsplit(".", 1) if "." in filename else (filename, "avi")
          output_path = f"{base}_b{b}.{ext}"

      fourcc = cv2.VideoWriter_fourcc(*"MJPG")
      writer = cv2.VideoWriter(output_path, fourcc, fps, (width, height))

      for f in range(num_frames):
          writer.write(video_data[b, f])

      writer.release()
      print(f"Wrote {output_path} ({num_frames} frames, {width}x{height} @ {fps} fps)")


pipe = ov_genai.Text2VideoPipeline(model_path, "GPU")
video = pipe.generate(prompt).video

save_video("genai_video.avi", video)
- CPU
- GPU
#include "openvino/genai/video_generation/text2video_pipeline.hpp"
#include "imwrite_video.hpp"

int main(int argc, char* argv[]) {
  const std::string models_path = argv[1], prompt = argv[2];

  ov::genai::Text2VideoPipeline pipe(models_path, "CPU");
  ov::Tensor video = pipe.generate(prompt).video;

  imwrite_video("genai_video.avi", video);
}
#include "openvino/genai/video_generation/text2video_pipeline.hpp"
#include "imwrite_video.hpp"

int main(int argc, char* argv[]) {
  const std::string models_path = argv[1], prompt = argv[2];

  ov::genai::Text2VideoPipeline pipe(models_path, "GPU");
  ov::Tensor video = pipe.generate(prompt).video;

  imwrite_video("genai_video.avi", video);
}
Use CPU or GPU as devices without any other code change.
Additional Usage Options
Use Different Generation Parameters
Generation Configuration Workflow
- Get the model default config with
get_generation_config() - Modify parameters
- Apply the updated config using one of the following methods:
- Use
set_generation_config(config) - Pass config directly to
generate()(e.g.generate(prompt, config)) - Specify options as inputs in the
generate()method (e.g.generate(prompt, max_new_tokens=100))
- Use
Video Generation Configuration
You can adjust several parameters to control the video generation process, including dimensions and the number of inference steps:
- Python
- C++
import openvino_genai as ov_genai

pipe = ov_genai.Text2VideoPipeline(model_path, "CPU")
fps = 25
video = pipe.generate(
  prompt,
  width=512,
  height=512,
  num_videos_per_prompt=1,
  num_inference_steps=30,
  num_frames=161,
  guidance_scale=7.5,
  frame_rate=fps
).video

save_video("genai_video.avi", video, fps)
#include "openvino/genai/video_generation/text2video_pipeline.hpp"
#include "imwrite_video.hpp"

int main(int argc, char* argv[]) {
    const std::string models_path = argv[1], prompt = argv[2];

    ov::genai::Text2VideoPipeline pipe(models_path, "CPU");
    float fps = 25;
    ov::Tensor video = pipe.generate(
        prompt,
        ov::genai::width(512),
        ov::genai::height(512),
        ov::genai::num_videos_per_prompt(1),
        ov::genai::num_inference_steps(30),
        ov::genai::num_frames(161),
        ov::genai::guidance_scale(7.5f),
        ov::genai::frame_rate(fps)
    ).video;

    imwrite_video("genai_video.avi", video, fps);
}
negative_prompt: Negative prompt for video(s) generation.width: The width of resulting video(s).height: The height of resulting video(s).num_frames: Number of frames to generate for each video. Higher values produce longer videos but increase compute and memory.num_videos_per_prompt: Specifies how many video variations to generate in a single request for the same prompt.num_inference_steps: Defines denoising iteration count. Higher values increase quality and generation time, lower values generate faster with less detail.guidance_scale: Balances prompt adherence vs. creativity. Higher values follow prompt more strictly, lower values allow more creative freedom.generator: Controls randomness for reproducible results. Same generator seed produces identical videos across runs.frame_rate: Target video FPS used by the pipeline.
For the full list of generation parameters, refer to the Video Generation Config API.